Posts tagged ‘ios

Designing for the Apple Watch

Since the release of the Apple Watch, we have already had discussions with clients about how they were interested in releasing a watch app. As the Apple Watch is such a small and personal device, development of apps need to be approached in a completely different way to mobile.

We now have a very limited number of interactions:

  • Force Touch (bring up menu options)
  • Tap (tap an menu option or button)
  • Scroll (scroll with the digital crown or using the touch display)

With the Apple Watch being on the wrist, the attention required of the user should be as short as possible. The user has to raise their wrist to use the interface and holding out an arm can get tiring very quickly.

What is being displayed should be exactly what the user needs right now and should cut out any form of fancy images or overlays that do not contribute to the information being conveyed.

As a quick example, a few weeks ago I built an Apple Watch app for Sprinter. Sprinter for iOS allows the user to see which tasks are assigned to whom, and which tasks are being worked on, completed or are yet to be started. It also allows the user to add items, view and reply to comments and view attachments.

Trying to copy as much functionality into a Watch app would have been crazy and borderline impossible technically. Right away I knew exactly what I could change to show only the information that is required by the user:

  • Only show what is assigned to me
  • Only show what is in-progress
  • Option to switch project (using a Force Touch interaction)

These made sure that the app showed only what the user cared about. There was no need to scroll through tons of tasks that weren’t assigned to the user, and basically allowed the user to say “So that’s what I’m working on today”.

It’s quick and shortens the attention required of the user. There’s no way to create new tasks, or make and read comments. The user can do that on their phone or desktop if they want to read through lots of text and options.

Overall, Apple Watch apps are designed for short glances and not to consume content. They should be limited to display only what the user needs to see right now, nothing more. That’s not a slight on the device; in fact, the simplified interaction is vital to its usefulness sitting pride of place on your wrist.


HSM App Featured By Apple

We’re excited to announce that the app we’ve been working on with Hello Sunday Morning was released last week! On top of that, Apple was kind enough to feature it as App of the Week in Australia.

The app suggests challenges you can do as an alterantive to drinking and provides useful stats on how your health is improving as a result.

You can leave comments and tips on your favourite challenges, share what you are doing on your profile and check in each week with how things have been going.

We’re really proud of how it turned out and hope that it will help thousands of people improve their relationship with alcohol!

Interested in taking on some fun challenges and tracking your health? Try it out today.


Deploying to the App Store

When you or your team has finished developing their new iOS App, the focus then moves over to making sure it is ready for the App Store. This blog post will go over some fundamentals that you and your team will need to think about when submitting an app to the App Store.

Testing

I can’t stress enough how important testing is when getting your app ready for the App Store. Unlike the web, you can’t release small bug fixes every couple of days. Whilst some may say that this is a huge flaw with Apple having to review apps before they go live, I think it gives you a chance to think about the importance of what the first or latest release of an app will contain.

Apple provides us with two main ways of getting apps onto devices for testing:

Xcode & Provisioning Profiles

I’m not going to go into much detail about this as it’s mainly aimed towards developers. The quickest way for an app to go into the developers hands is via Xcode itself. This is the tool that is used to write, debug and package iOS Apps.

It is fine for a small handful of developers who only need to look after their own devices, but when you want to start testing apps with more users who are not tech savvy, you’ll need to look at TestFlight.

TestFlight

TestFlight is a service provided by Apple that allows you to give out new builds of an app to users so they can use the app before it’s released on the App Store. Unfortunately there are still some hurdles that need to be looked at before your app can be installed.

There are two types of user that can use TestFlight. These are Internal Testers and External Testers.

  • Internal Testing
    • Limited to users who are counted as part of the organisation
    • Must have an Admin or Technical role on iTunes Connect
    • Limited to 25 members by default
    • Does not require Apple to review the build
  • External Testing
    • Can be given to anyone with an email address
    • Must have iOS 8 installed for it to work
    • Limited to 1,000 testers
    • Requires Apple to review the build

When building for TestFlight, you must try to make sure you get a build reviewed by Apple as early as possible if you want any external testers trying out your application. In our past experience the review time for external testing was around 2 days.

Localisation

I’ve seen it happen time and time again, people will spend all their time working on an app and be super excited for it to be submitted to the App Store, only to realise that they’ve forgotten that not everyone speaks English.

Apple allows you to create localised App Store descriptions when submitting, so make sure that if you want the marketing material to be in the users local language, you actually get people to translate the material well before you want to submit the application.

Secondly, don’t forget that it has been localised, if you change major features of the app, make sure you also update the localised versions of the material to keep in line with how the primary language reads. Remember that you will also have to update your screenshots on all localisations.

Imagery

When submitting an App for the App Store, you’ll be required to add a large App Icon as well as some screenshots. These are the face of your application, they are as important, if not more, as your app name. The only way users can see if your app is the one they want to download is by browsing through the content they can see on the App Store.

To prevent any hiccups you’ll need icons and screenshots to be of a certain size and quality. Thankfully Apple provides a list of exactly how you should export your images on their iTunes Connect Developer Guide.

Review Times

Almost all clients ask Terracoding how long it will take from the app to be submitted until it’s actually live on the App Store. All I can say is that it varies. It can also depend on a lot of factors that may include:

  • New iOS device being released
    • Usually when a new device with a different screen size comes out, developers will be pushing out lots of updates to make sure their app looks good on the new device
  • New major iOS version released
    • As with any major release, Apple usually brings out new features that can be utilised in apps. Companies love adding in the new popular features into there apps, and with that comes a big spike of new apps or updates being submitted to Apple for review

Other than that, we can tell you that we’ve had new apps or updates accepted anywhere between 1 day and 1.5 months. Most often it’s between 1-2 weeks for a first app to be reviewed and accepted.

Rejections

So you’ve followed all the advice above and your app has been rejected. Don’t panic! Rejections can happen for a long list of reasons, and most of them being from a small bug or a slight complaint about the meta data provided for the application.

Some common rejections could be:

  • Link to a site that contains a payment form
    • If you’re app costs money, and you’re also linking to a site that has a payment form on it, you’ll probably get rejected.
  • No demo account provided
    • If you’re app has any form of user accounts, you’ll need to provide Apple with a demo username and password for the app. Without this they will just reject your application
  • UI Bugs
    • Make sure you test your application on the iOS Simulator without an onscreen keyboard. Developers can often forget that some users will and do use an external keyboard with their iOS device, and if apps break because of it, you will get rejected.
  • Crashes
    • If your app crashes whilst Apple is reviewing the app, they will reject it. Make sure you have tested the app as if you were a brand new user, as well as someone who is logging in with an existing account.

A really good site to look at when making sure your app is App Store ready, is by having a good read through of Apple’s iOS Human Interface Guidelines (or HIG for short). These contain all kinds of default behaviours for key components of iOS.


The 6 Stages of App Development - Part 2

In Part 1 of this series I outlined the reasons why we follow a methodical approach to developing apps for clients and discussed the intial stages: analysing the problem, feature design and interaction design.

This post covers the final stages leading up to release: visual design, building the app and testing.

Stage 4 - Visual Design

With a set of features laid out for our app, we can start to add polish to how it looks. During this design phase we tend to produce mockups of how the app will look in Photoshop and work closely with the client to make sure everyone is happy with the style, colours and branding.

It’s important to remember that these mockups aren’t exactly how the final app will look. Due to the range of screen sizes and orientations, this stage is more about creating a guide for common elements used throughout the app. Still, focusing on the major views as a whole lets us design elements like toolbars and buttons in the context they’ll be used.

iBeacon App Mockup

When we reach this stage it’s easy to think that the bulk of the hard work has been done; we’ve planned out exactly what the app will do and here it is on screen looking great! In fact, there is still a lot of work to do converting these static mockups into a stable, functional app.

Stage 5 - Building the App

This stage - turning our designed app into a reality - is the one that will involve the client the least. We’ll need to get our heads down and write the code that detects the user’s actions (e.g. a button tap or swipe) and does something in response. It might be as easy as presenting the next view or something very complex like running a real-time 3D simulation but it all needs to be programmed.

In this stage we’ll also build any back-end infrastructure that the app needs to communicate with. This is usually a web server that the app sends and receives data to/from.

Progress updates might not be as exciting for a week or two but, given time, we’ll produce a working app that we can install on a device for you to test.

Stage 6 - Testing

Finally, with a working version of the app built, we’re ready to start putting it through its paces.

For saftey-critical applications we will spend time writing automated tests that cover all possible tasks required of the app and can be run at high-speed often. This helps us ensure changes we make in the future don’t break existing functionality elsewhere.

More commonly though, this stage will involve sitting down with the end-user (be that you or potential customers) and observing them and asking questions. We can do a private release targetted at specific email addresses.

We’ll also set up analytics so that we can collect data on user activity. This will help us uncover bugs and see what features are being used most.


So that’s it! A well thought out, good looking, first version of your app. Hopefully it will have gone down well with test subjects and be ready for a wider launch.

At each stage, especially based on feedback in Stage 6, we can revisit any of the earlier stages of development and rethink something. It might be that users are put off by the colours used so we jump back to Stage 4 and redesign something. Maybe testers flag up a vital missing feature that we can go back to Stage 2 and plan.

The whole process is flexible, but using this framework we can be sure that things progress in a logical way towards a quality app.


The 6 Stages of App Development - Part 1

With each business that comes to us with an idea for an app or a problem they are facing, we tend to approach designing and building the solution in a similar way. Methodically breaking things down helps us articulate timescales as well as keep track of where we’re heading with development.

Each project is unique and requires flexibility within this loose framework. In a lot of cases we’ll collaborate with third parties to complete all or part of a stage. Sometimes the plan will change mid-way through development and we’ll adapt by revisiting a previous stage or cycling through a number of them for a few iterations. Nothing is nailed down, but hopefully this will give you an insight into the milestones a lot of our projects pass in the lead-up to release.

Stage 1 - The Problem/Idea

Before we can start thinking about a software solution, it’s important to really get our heads around what it is we’re solving. In a lot of cases, companies come to us with a pretty clear idea of what they want building. We like to get together and discuss the motivation behind the project in detail before we get started for a number of reasons:

  • We need to understand your business to appreciate how the problem affects you and what kind of software would be appropriate.
  • What one person perceives to be the problem might not always turn out to be the thing that needs addressing directly. You know your business better than anyone, but sometimes it takes an outsider to tease out the root cause or a higher-level issue that can be overlooked in the day-to-day running of a company.
  • Sometimes the vision for an app is just not feasible (especially within budget and time constraints). Equally, there might be a solution you hadn’t considered possible. As technical experts we can help analyse the problem in the context of what apps, and the platforms they run on, are capable of.

Stage 2 - Feature Design

Once we have nailed down the problem or need that our application is going to address, we can start designing a solution. Is it going to run natively on a mobile or in a web browser? What operating systems should be supported? Exactly what will users be able to do with the software?

In almost every case, we suggest reducing the scope of an application right down to the bare essentials and focusing on getting those few features right for a first release. This is called a Minimum Viable Product (MVP) and allows us to get something useful into people’s hands as soon as possible. That way, users can benefit from our solution and we get valuable feedback to guide further development, informing decisions and saving money in the long run.

Stage 3 - Interaction Design

Now we know what form the software is going to take and what the first version will do, we can start considering how users will interact with it, commonly referred to as User Experience (UX). To do this, we tend to produce ‘wireframes’ - low-fidelity mockups of the different views the application might have and how the user will get from one to the other while completing a task. While only made up of boxes, lines and text, the wireframes are coupled with notes on how elements might react to user actions.

Example of wireframes

After plenty of iteration with the client, the wireframes should eventually provide a complete overview of the layout of the application. They should be detailed enough to demonstrate how a user would navigate the software to complete any task we have chosen to cover in our MVP.


That’s all for part one. In part two I’ll cover visual design, programming and testing.


Museum iBeacon Application

iBeacon and BLE technology is often being discussed in the media giving people new and intuitive ways to improve the retail and shopping experience. Here at Terracoding, we are looking at other areas that iBeacon technology could be applied to create rich and immersive encounters.

Local museum example

When walking around a museum, children can quickly loose interest, or feel that there is not enough content that is interactive for them. Another issue arises when there are a number of touch displays throughout the museum, and during peak times, those displays have lots of people surrounding them, meaning that unless you wait in a queue, you will miss some great content. Children’s minds need to be stimulated, and need something to keep them busy to prevent them from getting too bored. We want to help museums and other similar institutes by providing them with a platform for increased engagement by children, and adults alike.

iBeacon App Mockup

It is well known that there are three main types of learning styles:

  • Auditory learners (those who learn by listening)
  • Visual learners (those who learn by looking, or reading)
  • Kinesthetic learners (those who learn by touch, or by “doing”)

We want to provide something that gives a more complete learning environment, a well-rounded approach, that appeals to all three. We want to help build applications that give people a chance to learn more about the current thing they are viewing in a museum, whether that be by watching a related video, playing a related game or listening to auditory commentary. Providing this, and also something that is fun, to use would be extremely beneficial to the experience of learning from the exhibitions.

With iBeacon technology, plus our skills, we wanted to bring something that gives this amazing experience to as many people as possible.

Our proposition

We want to bring this technology and our platform to a few small or highly interested museums, galleries and similar experiences.

We have built a mobile application that can provide interactive maps, videos, images, and information as well as give the museum holders a way to see which areas of the museum are being visited by the most people, and at which time of the day.

We want a museum that can work together with us to bring an amazing and rich experience to the table for both children and adults alike.

If you think that you would like something like this, please get in touch.


Hack Day: iBeacons

Shops and malls are going to get pretty interesting with a relatively new type of technology that could help shoppers navigate around large stores, as well as improve the discovery of available offers in a store.

BLE (Bluetooth Low Energy or Bluetooth Smart) is a technology that was introduced as part of the main Bluetooth standard in 2010 and also included in the Bluetooth 4.0 specification. Apple’s recent announcement of iBeacons alongside OS 7.0 has introduced a number of new ideas to both developers and owners of large shops and businesses.

The standard has been available on iOS devices since the release of the iPhone 4s, and can be utilised on Android devices running version 4.3 and later. However, the market share of Android devices using 4.3+ is only around 4.2%, as measured on December 2, 2013, so the main focus has been primarily with iOS.

So with all of this in mind, I bought some beacons from Estimote to hack away and see what I could come up with:


Raptor for iOS

It’s been quite a while, but we are now announcing the upcoming release of Raptor for iOS.

Raptor is an App.net client for iPhone, and has been in development since the release of the App.net API. The app is now in the App Store review stages and we will release another post when it comes live.

The app has some great features including:

  • Global Stream
  • Mentions
  • My Posts
  • My Stream
  • Profiles
  • Pull to refresh
  • Create a post
  • Reply to posts
  • Share posts
  • View followers/following
  • Conversation View
  • Infinite Scroll

Raptor for iOS


Sprinter for iOS

Recently I have been working closely with the Sprint.ly team to work on the development of our new app for iOS, named “Sprinter”.

Sprinter is an iOS app that enables the user to access all their projects and items that are held on the Sprint.ly website. It works very similar to a Kanban board. Behind the scenes we have been testing the app with a number of close friends of Terracoding to try out our latest new product.

Over the past few days I have been packaging up the app ready for the public! Although not yet fully ready for release, we are making a few last minute fixes and getting the final testing ready for a proper release early November.

We have decided to first release the iPhone version of the app as we would love to hear peoples thoughts on the app before we release a new version alongside the iPad release.

In the mean time, you can check out the product page that contains a few pre-release screenshots.

If you have any further questions regarding the app, or would like to share your thoughts on the release, feel free to email us.


Testing in iOS

Since doing some programming in a TDD format, I realised the lack of documentation about testing in iOS. A number of the testing documents on the Apple Developer site have now vanished and redirect to “Real-World Testing”, which is not desired. The community behind Ruby (on Rails) seems to be heavily biased towards writing tests and testing a relatively large percentage of code coverage, if not all of it. Switching from a number of heavily tested projects in Rails to a new iOS application, I thought testing should be a large part of it to make sure everything was working.

Test-Driven Development

Test-Driven Development (TDD) is a way of developing websites/applications by writing the most basic of tests, and making them pass with your code. By only writing enough code to past the tests, and nothing more, the coverage of tests can be endless. You will have the knowledge that almost anything you break will get tested and show up in red.

When developing Rails apps, I usually use features such as rspec and cucumber to run all my tests (including user interaction). Moving from testing in Rails to iOS was a little harder to find well documented steps.

Testing in iOS

SenTestingKit (OCUnit) is the default testing library included in the Apple Docs (however some of the docs are pretty old). This is a simple unit testing kit for testing methods return the correct values, and runs very similar to the Java equivalent (JUnit). Most testing will be done with this kit when using Xcode, and with a few other libraries such as OCMock, you can develop iOS in a close-to-TDD way.

Creating tests using OCUnit is a very simple process that for each test, you create a method, and a simple comparison between objects, values etc.

A simple test can look like the following:

- (void)testFullName
{
    Person * person = [[Person alloc] init];
    [person setFirstName:@"John"];
    [person setLastName:@"Doe"];
    STAssertTrue([[person fullName] isEqualToString:@"John Doe"], @"");
    [person release];
}

Testing certain UI elements can also be done using OCUnit. This requires you to share your view controller and view with the test implementation file. Such that:

- (void) setUp {
    app_delegate    = [[UIApplication sharedApplication] delegate];
    myController    = app_delegate.myController;
    myView          = myController.view;
}

- (void)testUI
{
    [myController press:[myView viewWithTag:1]];
    STAssertTrue([[myController.lbl text] isEqualToString:@"John Doe"], @"");
}

Mocking

OCMock is a tool that is used for creating and testing mock objects in your application. Mock objects are simulated objects that mimic the behaviour of real objects in an application.

Advantages of using mock objects:

  • Testing objects that may not exist yet, or objects that may change behaviour
  • Testing whilst not effecting a database
  • Objects that may contain modified methods just for testing purposes

Mock objects can be tested as follows using OCMock:

myMock = [OCMockObject mockForClass:[NSString class]];
[[myMock expect] isEqualToString:@"myString"];
[myMock isEqualToString:@"myString"];

Instruments

Xcode’s instruments are great for testing your application when using real or test data. This was something that I only started using pretty recently. Basically, Instruments are a set of tools that enable you to profile and track processes when testing your applications.

Originally, I had many problems when learning about memory management in CocoaTouch, I soon learnt the basics, but my only real knowledge came when profiling my applications and actually seeing graphics of where memory was being retained well after it should have been released.

Instruments gives you memory counters and graphics to see where abouts and at what time memory is being retained when it shouldn’t. It also gives great insight into when memory is being allocated to objects, that may never get used. For example, initialising objects in viewDidLoad or in the controller init well before the object is being used may cause threads to hang whilst methods are being called, whereas a user may access the view controller without calling on the object. It also taught me when and where to initialise objects, and where to check if the object has already been initialised previously (for example, in methods that may get called a few times).

Real-World Testing

I’ve never been so impressed with any iOS libraries as much as I have been with TestFlight. TestFlight is an awesome site where you can upload IPA’s of your applications and have them delivered to testers over-the-air.

Using something like TestFlight means you can have them register their device using MobileSafari, and having their device id available for you to add them to the AdHoc provisioning on the Apple Developer site. TestFlight gives you an SDK that enables any error logs, NSLogs and checkpoints to be uploaded directly to the build reports on the website. Checkpoints on TestFlight let you check how deep testers are using your application. Other reports include how long a testers session lasts for and what devices the app has been installed onto.

I’d have to say, TestFlight is a god send when you have a group of beta testers that you want to deliver an app update to without having to email or sync any devices to iTunes.

Conclusion

Testing in iOS may not be widely spoken about, however there are definitely some great tools to get you started. I’ve added a list of links below to give you some insight in setting up your iOS testing environment:


NSObject for REST API Calls

In this tutorial I am going to teach you how to create your own NSObject that can make calls to your own web REST API and use it to retrieve the response received from the server. I am going to do this with the help of ASIFormDataRequest (ASIHTTPRequest). This will mean your iOS app will be able to make calls to your web server and download information to your app. The following tutorial is useful for if you want to perform tasks such as logging into an online account or registering a new user from within your application.

Getting Started - Initial Steps

Before we do anything, we need to create a new XCode iOS project. Do this, making sure that the project is a navigation-based project. Then we need to make sure that ASIHTTPRequest builds correctly in your project. So firstly, download it from their GitHub page here: Download Link. You then need to copy the files over into your project making sure iPhone projects have ASIAuthenticationDialog.h/m and Reachability.h/m included.Once you have included the files into your XCode project, the next step is to add the following frameworks into your project as well:

  • CFNetwork.framework
  • SystemConfiguration.framework
  • MobileCoreServices.framework
  • CoreGraphics.framework
  • libz.1.2.3.dylib

After these initial steps, you should be able to build your project without any errors. If you do come into any problems, refer to the ASIHTTPRequest setup instructions.

Let’s Do This!

Now you have the required classes in your project we can really start to have some fun! Let us start by creating an NSObject that will handle all the calls to your server and return only the necessary data back to your controllers. This is very useful as it keeps all the networking code away from your view controllers. By the end of this tutorial you will be able to use the following few lines of code to make a call to an API and return back information:

DWNetwork * network = [[DWNetwork alloc] init];
int response= [network sendTitle:@"My Title" withBody:@"This is the body for the post"];

For example, the two lines above would create our own object (in this case called DWNetwork) and the second line will use the object to send two strings to a web API. Later on in the tutorial I will show you how to use threading to make sure your application does not hang whilst this data is being sent.

Creating the NSObject

With your project already open, create a new file by clicking

File > New > New File > Objective-C Class > Subclass of NSObject > Next

and then save the file as DWNetwork.

When we initialise the object from our controller, we want to return our DWNetwork object and use this method to initialise any values within our object. So from DWNetwork.h, make the file contain the following:

#import
@interface DWNetwork : NSObject
- (DWNetwork *)init;
@end

And the counterpart (DWNetwork.m) to contain:

#import "DWNetwork.h"

@implementation DWNetwork

- (DWNetwork *)init
{
  return self;
}

@end

Now with what we have written we can already create an instance of our object ready to make calls to it. Now we need to include ASIHTTPRequest into the application and make our first API call!

Including ASIFormDataRequest in the NSObject

All we have to do for this is include #import "ASIFormDataRequest.h" at the top of the DWNetwork.m file.

Making our first API call

As an example, I am going to use my DWNetwork object to create a blog post on a website using POST data to its API. The URL string that I am going to use is:

http://website.com/api/blog/new_post

On the server this takes the following form POST keys:

@"post_title"
@"post_body"

So naturally, I want to create a public method in DWNetwork that allows me to pass in the title and body of a blog post that it will handle and send to the API in the correct format. To do this I first go into the header file and write the following line beneath the init:

- (int) sendTitle:(NSString *)title withBody:(NSString *)body;

This lets other controllers that are using my object to see that this method is available and therefore can be used. Then within the implementation, I will write the following code:

- (int) sendTitle:(NSString *)title withBody:(NSString *)body
{
  return nil;
}

Now our object has its first proper method that can be called (Albiet returns nil)!

Within this method we want to utilize the title and body that we pass into it plus use the URL that they are going to be posted to. Now we get down implementing ASIFormDataRequest that will take all this information and do something magical with it!

In the line above return nil; we will write the following:

NSString * urlString = [NSString stringWithFormat:@"http://website.com/api/blog/new_post"];

This is the URL that ASIFormDataRequest will use. Then we write:

ASIFormDataRequest * request = [ASIFormDataRequest requestWithURL:[NSURL URLWithString:urlString]];

If all is written down correctly, then building the project shouldn’t come up with any errors (although it will come up with a warning for a the unused request).Now we can start adding the title and body to our API call:

[request setPostValue:title forKey:@"post_title"];
[request setPostValue:body forKey:@"post_body"];

As I wrote previously, post_title and post_body are the keys that the REST API on the server will use for the title and body of the new blog post. So we use the [request setPostValue:(id) forKey:(NSString *)]; to pass in our variables.

Finally, we call:

[request startSynchronous];

to start up the connection to the API and transmit the data from our application.

Following this correctly so far, your DWNetwork.m file should look like the following:

#import "DWNetwork.h"
#import "ASIFormDataRequest.h"

@implementation DWNetwork

- (DWNetwork *)init
{
  return self;
}

- (int) sendTitle:(NSString *)title withBody:(NSString *)body
{
  NSString *urlString = [NSString stringWithFormat:@"http://website.com/api/blog/new_post"];

  ASIFormDataRequest *request = [ASIFormDataRequest requestWithURL:[NSURL URLWithString:urlString]];
  [request setPostValue:title forKey:@"post_title"];
  [request setPostValue:body forKey:@"post_body"];
  [request startSynchronous];

  return nil;
}

@end

At the moment (if the server is set up correctly) the request will send the data to the server. However, we are yet to know if this has failed or succeeded. So our next step is to return the response status code from the server.

Returning the response status code

This is a very simple step as ASIFormDataRequest has a built in method to call to retrieve the status code from the server.

All we have to do is replace return nil; with return [request responseStatusCode];

This will return an int that can be checked by your application to notify the user of the response from the API call. For example, the following numbers may be returned:

200 – Successful
400 – Bad Request
401 - Unauthorized
403 – Forbidden
404 – Not Found
405 – Method Not Allowed

ASIFormDataRequest also allows you to return an NSString with different information. We won’t be using it yet, but in the future you could return methods such as:

// Returns the status message
return [request responseStatusMessage];
// Returns the whole response as a string
return [request responseString];

Now we have an NSObject (DWNetwork) that:

  • Can be initialised
  • Get sent an NSString of the post title and post body
  • Send the strings to a server
  • Check the response status code

Now you just have to link this up to the UI!

Creating a new thread

Threads are really useful and will come in handy when you create a web heavy application such as a Twitter client, online game etc. And the great thing is, they are so simple to implement! All we need to do is create the method that the actual thread runs, and two other methods that will handle the response once the thread has completed.

Modify your RootViewController.m file so that the following is added:

- (void)post
{
  [NSThread detachNewThreadSelector:@selector(postThread:) toTarget:self withObject:nil];
}

- (void)postThread:(NSConnection *)connection
{
  NSLog(@"New thread started");
  NSAutoreleasePool *pool = [[NSAutoreleasePool alloc] init];

  DWNetwork * network = [[DWNetwork alloc] init];
  int response = [network sendTitle:titleField.text withBody:bodyField.text];
  if (response == 200) {
    [self performSelectorOnMainThread:@selector(postSuccess) withObject:nil waitUntilDone:YES];
  } else {
    [self performSelectorOnMainThread:@selector(postFailure) withObject:nil waitUntilDone:YES];
  }

  [pool release];
}

- (void)postSuccess
{
  UIAlertView * alertView = [[UIAlertView alloc] initWithTitle:@"Success!"
                                                       message:@"Your post has been sent"
                                                      delegate:self
                                             cancelButtonTitle:@"Ok"
                                             otherButtonTitles:nil, nil];
  [alertView show];
  [alertView release];
}

- (void)postFailure
{
  UIAlertView * alertView = [[UIAlertView alloc] initWithTitle:@"Error!"
                                                       message:@"Your post failed to send"
                                                      delegate:self
                                             cancelButtonTitle:@"Ok"
                                             otherButtonTitles:nil, nil];
  [alertView show];
  [alertView release];
}

Now when the user clicks a post button, the UI will not lock up, and also a UIAlertView will be shown with its contents dependant on whether the post succeeded or failed to send!

DWTagList for iOS

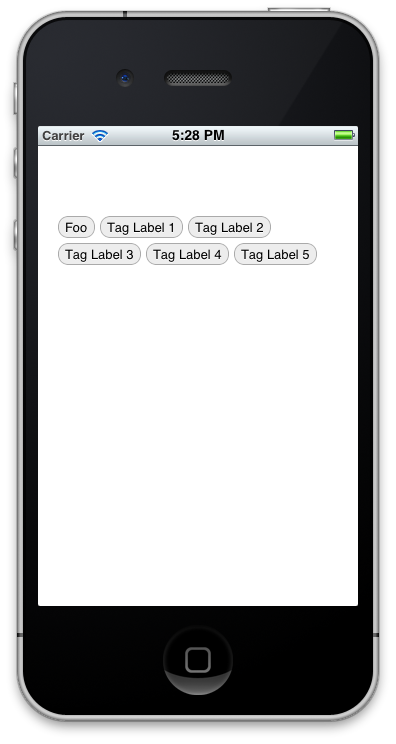
The other day I started development on a new iOS app for a website, but I soon came across the notion of having to list sets of tags in a nice way in a UITableViewCell.

I started off thinking the task would be quick hard compared to the rest of the application, however, with a few methods and a subclass of UIView it was done just short of 20 minutes.

I’ve set the code that you simply initialise it with the frame size, add an array of tags and then add it to your view. Almost everything is customisable including the padding, margins, background colour and font.

You can see the code here.

Post Archive

2014

December

2013

December

January

2012

October

September