Posts tagged ‘web

Natural Resource: Avoiding ActiveAdmin

Background

Natural Resource was born from frustrations experienced on legacy projects that used gems like ActiveAdmin to provide an admin interface for an app. For the very basics ActiveAdmin is great; it provides you a set of functionality out of the box that you don’t have to implement yourself.

Unfortunately, we are all aware that requirements change and functionality grows. ActiveAdmin forces you to extend it using its own concepts outside of standard Rails practices, sometimes going so far as to mix routing, controller and view details in the same file.

Rolling your own admin functionality?

After a frustrating few hours grappling with AA’s quirks, it’s easy to understand why someone would resort to rolling their own admin interface. Advanced admin features shouldn’t be any harder to implement than the rest of your app.

Secondly, it’s often hard to integrate large, opinionated admin gems because they try to blend authentication and/or authorisation logic with their own concepts. Whilst Natural Resource is also opinionated, it exists and performs in a very simple way and is easily overridden.

Enough talk - show me the code!

The following is a typical NR-based controller:

# Controller for generating and displaying Reports for orders received
class Admin::OrdersController < ApplicationController
  include AdminController
  include ReportDownloading

  resource :order

  def resource_scope
    Order.includes(:txns, line_items: [:product])
  end

  def report_class
    OrderReport
  end
end

If we take the above to have authenticated our admin-user (via your own AdminController concern) then our view could look like this:

%h1 Order Report

= search_form_for [current_context, query] do |f|
  = f.input :user_email_cont, label: 'Recipient Email'
  = f.input :amount_cents_gt, label: 'Amount greater than'
  = f.button :submit, "Apply filters"
  = link_to 'Download report', [:download, current_context, :orders,
    q: params[:q])

%table
  %tr
    %th Order Reference
    %th Payment Method
    %th Recipient Name
    %th Amount
    %th Created At
  - resources.each do |resource|
    %tr
      %td= resource.reference
      %td= resource.source_type.titleize
      %td= resource.user.name
      %td= resource.amount.format
      %td= resource.created_at

= will_paginate resources

The above controller offers several helper methods:

  • current_context is a method defined to specify the area of the site you are in. It is used for consistently defining routes.
  • query is the Ransack search object used for defining simple querying using the Ransack syntax.
  • resource_scope is the initial scope of the objects scoped via its respective policy, i.e. policy_scope(resource_scope)
  • resources is the lazy-loaded, paginated result of applying the Ransack query across the resource_scope method.

In Summary

The main motivation behind Natural Resource is to be pragmatic. There are further extensions that can be made to it to allow auto-generating initial views if a sensible standard set can be decided upon without introducing too much overhead/complexity.

It provides a rich set of foundational functionality and tries its best to take a sensible modular, easily overridden approach to standardised components.

There is an NR example repo that contains a more detailed example, but nothing beats reading the source. The majority of functionality is only ~100 lines long. I will add to the NR example repository as we use NR at Terracoding, converting the git history to a series of steps you can follow in the README.
Rails Polymorphic Feed Caching

When building a social platform, we’re often required to build a feed of some sort, usually containing multiple types of content such as posts, photos, etc.

With this in mind, it’s usually best to have a FeedItem model with a polymorphic association for the different types of feed items. Let’s say:

class FeedItem < ActiveRecord::Base
  belongs_to :source, polymorphic: true
  has_many :comments
end

class Post < ActiveRecord::Base
  belongs_to :user
  has_one :feed_item, as: :source, dependent: :destroy
end

class Photo < ActiveRecord::Base
  belongs_to :user
  has_one :feed_item, as: :source, dependent: :destroy
end

This is all well and good, but when you come to eager-load associations on the collection to improve performance, this technique becomes problematic. This is where Rails Fragment Caching comes into play.

Fragment caching is a really useful tool in Rails to cache partials and collections so they are pulled straight from memory without needing to access the database (besides checking if new records exist or existing records have been updated).

In the view that includes our feed partial we have the following:

- cache(cache_key_for_user_feed_items(resource, params[:page])) do
  = render 'feed_items'
module FragmentCacheHelper
  def cache_key_for_user_feed_items(resource, page = 1)
    count = resource.feed_items.count
    max_updated_at = resource.feed_items.maximum(:updated_at).try(:utc)
      .try(:to_s, :number)
    "user/#{resource.id}/feed_items_#{count}_#{max_updated_at}_#{page}"
  end
end

The FragmentCacheHelper generates a key for us to use. If the key differs when the next page is loaded, it will pull the records as usual and skip the cache. This works per page, so each page with will_paginate will also pull from the database if needs be.

This cuts down the database calls by only ever needing to check the count of the records for the user and the latest updated_at value.


Easy Retina Images with Carrierwave

We recently launched Dry July, a platform where people can raise funds for adults in Australia living with cancer.

When Dry July approached us, they emphasised that the majority of their traffic comes from smartphones and tablets. With the proliferation of “retina” mobile devices and Macs over the last few years, we wanted to selectively serve high-resolution images to keep things looking crisp for all users.

Almost every image on the Dry July platform, including for the customisable website theme, are uploaded through Carrierwave. That meant we could auto-generate multiple versions of an image on upload. In our uploader, we configured @2x and @3x versions for each version size:

# image_uploader.rb
version :small_3x do
  process resize_to_limit: [900, 900]
end

version :small_2x, from_version: :small_3x do
  process resize_to_limit: [600, 600]
end

version :small, from_version: :small_2x do
  process resize_to_limit: [300, 300]
end

version :thumb_3x, from_version: :small do
  process resize_to_limit: [150, 150]
end

version :thumb_2x, from_version: :thumb_3x do
  process resize_to_limit: [100, 100]
end

version :thumb, from_version: :thumb_2x do
  process resize_to_limit: [50, 50]
end

srcset, the HTML5 img attribute for serving multiple resolutions is thankfully widely supported these days. By adding this method to our application_helper.rb we could provide retina-capable image tags with ease:

# application_helper.rb
def retina_image_tag(uploader, version, options={})
  options.symbolize_keys!
  options[:srcset] ||=  (2..3).map do |multiplier|
                          name = "#{version}_#{multiplier}x"
                          if uploader.version_exists?(name) &&
                            source = uploader.url(name).presence
                            "#{source} #{multiplier}x"
                          else
                            nil
                          end
                        end.compact.join(', ')

  image_tag(uploader.url(version), options)
end

# view.html.haml
= retina_image_tag user.avatar, :thumb

produces

<img src="/users/avatars/thumb_me.jpg" srcset="/users/avatars/thumb_2x_me.jpg 2x, /users/avatars/thumb_3x_me.jpg 3x" />

Feel free to use the code above in your next project. And check out Dry July to see it in action!


Dynamic Rails App Theming

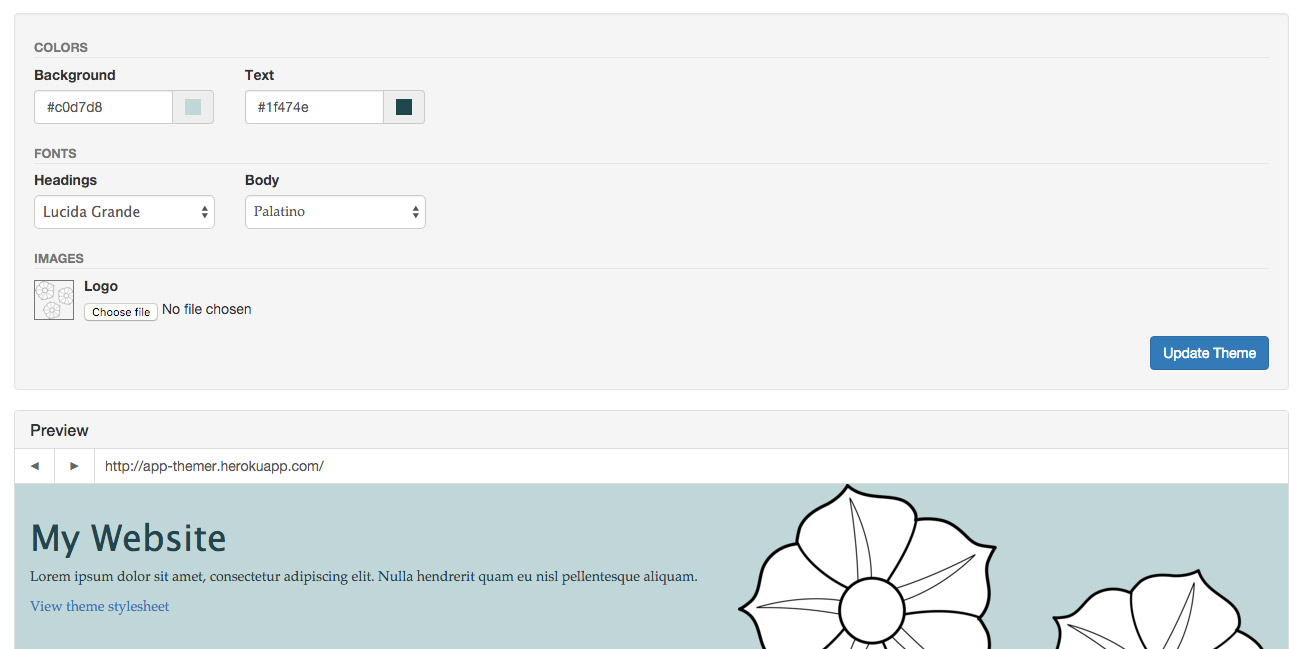
Themer UI

We started work on an exciting new project this week that requires a single Rails app to power multiple similar websites. The websites are all going to have the same features and basic structure but the client wanted to be able to customise colours, fonts and images for each site themselves.

To get our heads around the feature, we built a prototype app that provides a theme editing interface. You can try out the demo!

Themer UI

Technical Details

You include theme style rules in special comment blocks using color(), font(), and image_url() helpers:

body {
  /* defaults */
  background: white;
  color: black;
  font-family: sans-serif;

  /* THEME --------
  background-image: image_url(bg);
  color: color(text);
  font-family: font(body);
  -------- THEME */
}

Running rake theme:update will then generate a theme template from those comments at app/views/themes/show.css.erb.

Theme attributes can be easily added to the Theme model. The controller :show action is cached and the generated stylesheet is available at /theme.css to be included in the head of any page.

The theme editor presents a live preview by injecting styles into an iframe as the theme values are changed. This includes images, using the FileReader API to read them locally in Base64 before they are uploaded to the server.

To make sure override rules with missing values degrade gracefully, the app utilises browsers’ behaviour of ignoring any invalid rules whilst continuing to render the rest of the styles. This means any default styling can simply be included in the app’s main stylesheet (or anywhere you like).

Open Source

All of the source code is available on GitHub. Please fork and reuse the code as much as you like! Feel free to open an Issue on GitHub or you can reach us on Twitter @terracoding.


The 6 Stages of App Development - Part 2

In Part 1 of this series I outlined the reasons why we follow a methodical approach to developing apps for clients and discussed the intial stages: analysing the problem, feature design and interaction design.

This post covers the final stages leading up to release: visual design, building the app and testing.

Stage 4 - Visual Design

With a set of features laid out for our app, we can start to add polish to how it looks. During this design phase we tend to produce mockups of how the app will look in Photoshop and work closely with the client to make sure everyone is happy with the style, colours and branding.

It’s important to remember that these mockups aren’t exactly how the final app will look. Due to the range of screen sizes and orientations, this stage is more about creating a guide for common elements used throughout the app. Still, focusing on the major views as a whole lets us design elements like toolbars and buttons in the context they’ll be used.

iBeacon App Mockup

When we reach this stage it’s easy to think that the bulk of the hard work has been done; we’ve planned out exactly what the app will do and here it is on screen looking great! In fact, there is still a lot of work to do converting these static mockups into a stable, functional app.

Stage 5 - Building the App

This stage - turning our designed app into a reality - is the one that will involve the client the least. We’ll need to get our heads down and write the code that detects the user’s actions (e.g. a button tap or swipe) and does something in response. It might be as easy as presenting the next view or something very complex like running a real-time 3D simulation but it all needs to be programmed.

In this stage we’ll also build any back-end infrastructure that the app needs to communicate with. This is usually a web server that the app sends and receives data to/from.

Progress updates might not be as exciting for a week or two but, given time, we’ll produce a working app that we can install on a device for you to test.

Stage 6 - Testing

Finally, with a working version of the app built, we’re ready to start putting it through its paces.

For saftey-critical applications we will spend time writing automated tests that cover all possible tasks required of the app and can be run at high-speed often. This helps us ensure changes we make in the future don’t break existing functionality elsewhere.

More commonly though, this stage will involve sitting down with the end-user (be that you or potential customers) and observing them and asking questions. We can do a private release targetted at specific email addresses.

We’ll also set up analytics so that we can collect data on user activity. This will help us uncover bugs and see what features are being used most.


So that’s it! A well thought out, good looking, first version of your app. Hopefully it will have gone down well with test subjects and be ready for a wider launch.

At each stage, especially based on feedback in Stage 6, we can revisit any of the earlier stages of development and rethink something. It might be that users are put off by the colours used so we jump back to Stage 4 and redesign something. Maybe testers flag up a vital missing feature that we can go back to Stage 2 and plan.

The whole process is flexible, but using this framework we can be sure that things progress in a logical way towards a quality app.


The 6 Stages of App Development - Part 1

With each business that comes to us with an idea for an app or a problem they are facing, we tend to approach designing and building the solution in a similar way. Methodically breaking things down helps us articulate timescales as well as keep track of where we’re heading with development.

Each project is unique and requires flexibility within this loose framework. In a lot of cases we’ll collaborate with third parties to complete all or part of a stage. Sometimes the plan will change mid-way through development and we’ll adapt by revisiting a previous stage or cycling through a number of them for a few iterations. Nothing is nailed down, but hopefully this will give you an insight into the milestones a lot of our projects pass in the lead-up to release.

Stage 1 - The Problem/Idea

Before we can start thinking about a software solution, it’s important to really get our heads around what it is we’re solving. In a lot of cases, companies come to us with a pretty clear idea of what they want building. We like to get together and discuss the motivation behind the project in detail before we get started for a number of reasons:

  • We need to understand your business to appreciate how the problem affects you and what kind of software would be appropriate.
  • What one person perceives to be the problem might not always turn out to be the thing that needs addressing directly. You know your business better than anyone, but sometimes it takes an outsider to tease out the root cause or a higher-level issue that can be overlooked in the day-to-day running of a company.
  • Sometimes the vision for an app is just not feasible (especially within budget and time constraints). Equally, there might be a solution you hadn’t considered possible. As technical experts we can help analyse the problem in the context of what apps, and the platforms they run on, are capable of.

Stage 2 - Feature Design

Once we have nailed down the problem or need that our application is going to address, we can start designing a solution. Is it going to run natively on a mobile or in a web browser? What operating systems should be supported? Exactly what will users be able to do with the software?

In almost every case, we suggest reducing the scope of an application right down to the bare essentials and focusing on getting those few features right for a first release. This is called a Minimum Viable Product (MVP) and allows us to get something useful into people’s hands as soon as possible. That way, users can benefit from our solution and we get valuable feedback to guide further development, informing decisions and saving money in the long run.

Stage 3 - Interaction Design

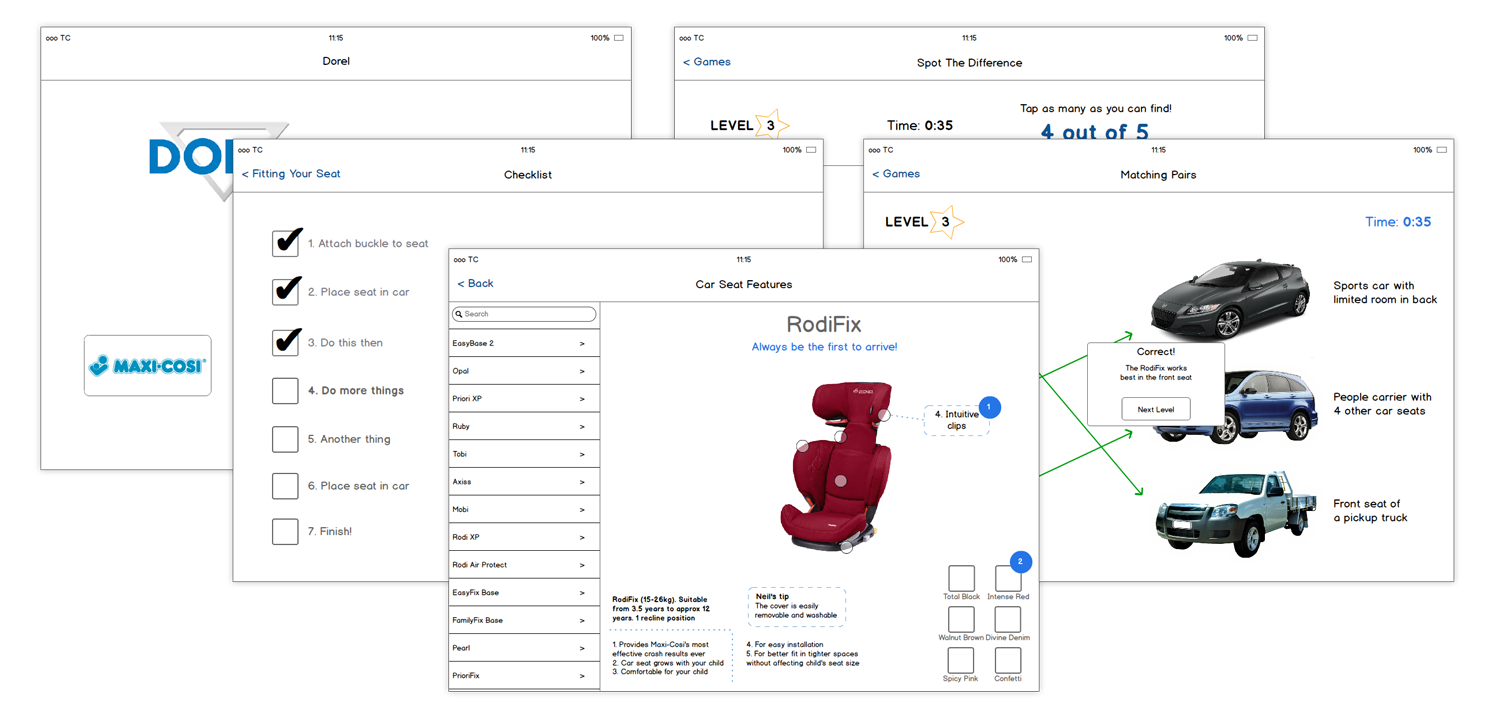
Now we know what form the software is going to take and what the first version will do, we can start considering how users will interact with it, commonly referred to as User Experience (UX). To do this, we tend to produce ‘wireframes’ - low-fidelity mockups of the different views the application might have and how the user will get from one to the other while completing a task. While only made up of boxes, lines and text, the wireframes are coupled with notes on how elements might react to user actions.

Example of wireframes

After plenty of iteration with the client, the wireframes should eventually provide a complete overview of the layout of the application. They should be detailed enough to demonstrate how a user would navigate the software to complete any task we have chosen to cover in our MVP.


That’s all for part one. In part two I’ll cover visual design, programming and testing.

Post Archive

2014

December

2013

December

January

2012

October

September